7 Steps to Design a Wheelchair Accessible Bathroom
Designing a wheelchair accessible bathroom requires careful planning and a deep understanding of universal design principles. This guide provides a logical progression from foundational considerations to advanced features, ensuring a functional, safe, and comfortable space for individuals using wheelchairs. By focusing on critical clearances, fixture selection, and thoughtful safety measures, you can create a truly inclusive bathroom environment.
1. Understand the Core Principles of Accessible Design
Before diving into specific measurements and fixtures, it’s essential to grasp the foundational philosophy behind accessible design. This isn’t just about meeting minimum compliance standards; it’s about creating an environment that maximizes independence, safety, and comfort for everyone, regardless of mobility challenges. The goal is to eliminate barriers and ensure dignity in personal care.
- Prioritize Space and Maneuverability: The most fundamental aspect is providing ample room for a wheelchair to turn and approach fixtures. Without sufficient clear floor space, even the most accessible fixtures become unusable.
- Ensure Ease of Use: All controls, faucets, showers, and accessories should be reachable and operable with minimal force and without requiring fine motor skills. Lever handles, push-button controls, and sensor-activated features are excellent choices.
- Focus on Safety: Mitigate risks of slips, falls, and burns. This includes appropriate flooring, properly installed grab bars, anti-scald devices, and thoughtful lighting.
- Consider Long-Term Needs: Accessible design often anticipates future needs, making a space adaptable as mobility requirements change over time. This can save significant costs and disruption later.
Key Takeaway: Accessible design is about creating an empowering, barrier-free environment that prioritizes user independence and safety over mere compliance.

2. Plan Essential Layouts and Clearances
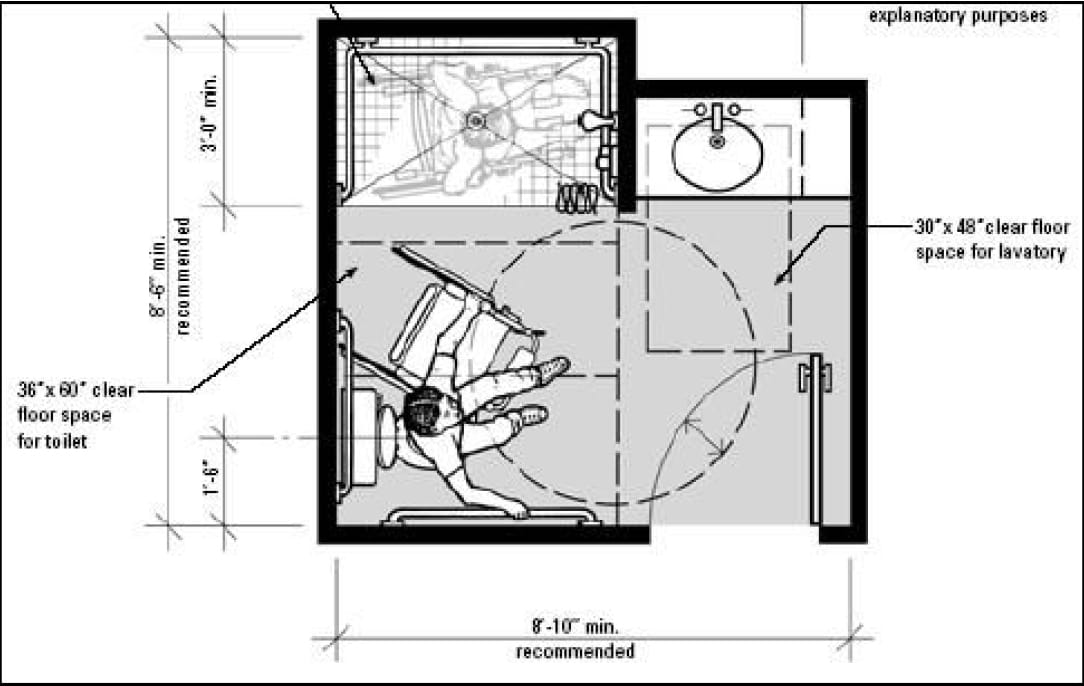
The layout is the backbone of any accessible bathroom. Precise measurements for clear floor space, door widths, and turning radii are non-negotiable for functionality. Skimping on these dimensions can render an otherwise well-equipped bathroom unusable for a wheelchair user.
- Doorway Width: A minimum clear opening of 32 inches is required, but 34 to 36 inches is highly recommended for easier passage, especially for power chairs. Consider offset hinges to gain an extra inch or two of clearance without widening the rough opening.
- Maneuvering Clearances: The most crucial space is the 60-inch diameter turning circle required for a wheelchair to make a 180-degree turn. This circle must be clear of obstructions, extending under sinks if necessary. Additionally, ensure clear floor space of at least 30 inches by 48 inches in front of all fixtures (toilet, sink, shower) for frontal or parallel approach.
- Toilet Placement: The toilet must have a clear space of at least 60 inches wide measured from the wall behind the toilet, and 56 inches deep measured from the back wall to the front of the toilet. This includes a clear space of 18 inches from the centerline of the toilet to the nearest side wall or obstruction.
- Roll-In Shower Dimensions: A roll-in shower requires a minimum clear floor space of 30 inches by 60 inches with no curb, allowing for a smooth transition from the bathroom floor. Alternatively, a 36-inch by 36-inch transfer-type shower stall can be used with a seat, but offers less flexibility.
Fact: A standard wheelchair requires a minimum clear floor space of 30 inches by 48 inches for a straight approach to a fixture, and a 60-inch diameter clear circle for a 180-degree turn.
Insight: These seemingly small measurements are critical; even an inch or two short can make the difference between a functional and a non-functional space for a wheelchair user.
Key Takeaway: Ample, unobstructed clear floor space and proper doorway widths are the most critical elements for ensuring wheelchair maneuverability within the bathroom.
3. Select Appropriate Fixtures and Fittings
Once the layout is established, choosing the right fixtures and fittings is paramount. Each element, from the toilet to the mirror, must be specifically selected to enhance accessibility and user independence.
- Toilets: Opt for an ADA-compliant elongated toilet with a seat height between 17 and 19 inches from the floor (including the seat). This higher height makes transfers easier. Consider wall-mounted toilets for adjustable height and easier cleaning underneath.
- Sinks and Vanities: Install a wall-mounted sink or a vanity with an open underside that allows a wheelchair user to roll underneath comfortably. The top edge of the sink should be no higher than 34 inches from the floor, with a clear knee space of at least 27 inches high, 30 inches wide, and 17 inches deep. Faucets should be lever-style or sensor-activated for easy operation.
- Showers: A roll-in shower with a curb-less entry is ideal. Equip it with a fold-down or built-in shower bench (17-19 inches high, 24 inches deep, 30 inches wide minimum). Install a handheld showerhead with at least a 60-inch hose, adjustable height, and easy-to-reach thermostatic mixing valve controls (mounted between 38-48 inches from the floor).
- Bathtubs (Optional): If a tub is desired, consider a walk-in tub with an outward-swinging door, integrated seat, and handheld shower for easier entry and exit, though roll-in showers are generally preferred for maximum accessibility.
- Flooring: Select non-slip, non-glare flooring materials like textured porcelain tile, vinyl, or rubber flooring. Ensure there are no changes in level greater than 1/4 inch, and any transitions are beveled.
Key Takeaway: Each fixture must be chosen and installed with specific height, clearance, and operational considerations to accommodate a wheelchair user effectively.
4. Incorporate Safety, Comfort, and Advanced Features
Beyond basic fixtures, integrating thoughtful safety elements, comfort features, and even smart technology can significantly enhance the quality of life for a wheelchair user.
- Grab Bars: These are essential safety devices. Walls must be reinforced with blocking before tiling or drywall to securely anchor grab bars. Install them strategically around the toilet, in the shower, and near the tub. For toilets, place a horizontal bar at least 36 inches long on the rear wall, and one 42 inches long on the side wall. In showers, place bars on all three walls.
- Mirrors: Install mirrors with their bottom edge no higher than 35 inches from the floor, or opt for a full-length tiltable mirror that can be adjusted for seated or standing users.
- Lighting and Switches: Provide ample, uniform, glare-free lighting throughout the bathroom. Light switches should be rocker or toggle style, mounted between 36 and 48 inches from the floor. Consider motion-activated lighting or smart lighting systems for hands-free operation.
- Storage: Design storage solutions that are easily accessible from a seated position. Pull-down shelving, shallow drawers, and open shelving at accessible heights (typically between 15 and 48 inches from the floor) are ideal.
- Advanced Technology: Explore smart home integrations such as voice-activated lighting or ventilation, heated flooring for comfort, and even automated blinds. Emergency pull cords or call buttons can also be installed near the toilet and in the shower for added safety.
Statistic: Falls are a leading cause of injury among adults, and many occur in the bathroom. Properly installed grab bars can significantly reduce the risk of bathroom falls.
Insight: Investing in robust wall reinforcement for grab bars is a non-negotiable safety measure that actively prevents serious injuries.
Key Takeaway: A truly accessible bathroom extends beyond basic requirements, integrating safety devices, comfort-enhancing features, and smart technology to create a fully supportive environment.
Frequently Asked Questions About Accessible Bathroom Design
What is the minimum recommended door width for a wheelchair accessible bathroom?
The minimum clear opening width for a wheelchair accessible doorway is 32 inches. However, for greater ease of use, especially with larger power wheelchairs or for caregivers assisting, a 34 to 36-inch clear opening is highly recommended. Using offset hinges on existing doorways can sometimes provide an additional 1-2 inches of clear width without requiring major structural changes.
Can I convert an existing bathroom to be wheelchair accessible without a full renovation?
It depends on the existing bathroom’s size and layout. Minor modifications like installing grab bars, changing faucet handles to levers, lowering a mirror, and raising a toilet seat can often be done without a full renovation. However, achieving critical clearances like the 60-inch turning radius, widening doorways, or creating a roll-in shower typically requires significant renovation to alter the room’s footprint or structural elements. A professional assessment is always recommended to determine feasibility.
How important is wall reinforcement for grab bars, and what kind of reinforcement is needed?
Wall reinforcement for grab bars is critically important for safety. Grab bars must be able to withstand significant force, as they are used for leverage during transfers and to prevent falls. Standard drywall alone cannot support this weight. Proper reinforcement involves installing solid wood blocking (typically 2×8 or larger lumber) horizontally between wall studs in the areas where grab bars will be mounted. This blocking should be securely fastened to the studs before drywall and tile installation, ensuring a robust anchor point for the grab bar fasteners.